2012年12月25日 星期二

Golden Shield Wargame 1 Writeup

In the first problem, a picture is given and ask you to decode it.
It's trivial to rotate 45 degree and remove useless part.Then we can observe that this QR code has opposite color, so we can change the colors. I write a small python program use PIL to rote picture.
import PIL
im = Image.open("QR1.jpg")
new_im = im.rotate(45)
new_im.save("QR2.jpg')


Use online QR code decoder, we can decode that
"恭喜您,解開了QRcode。請到 http://www.multiupload.nl/25BD9YIRO0,下載Golden Shield.apk,KEY就在裡面。"
Then we can goto website download the apk file.
After download the file, we use dex2jar convert the hex file to jar. Then we can use java decompiler to decompile the class file in jar back to java code.

The decompile result
 Then the string "@@@@您累了嗎? 來聽首歌好嗎?@@@@@" is the key.

Golden Shield Wargame 2 Writeup


This problem is "I am a bot. My boss give me a key!" and a file 100.bin is given.
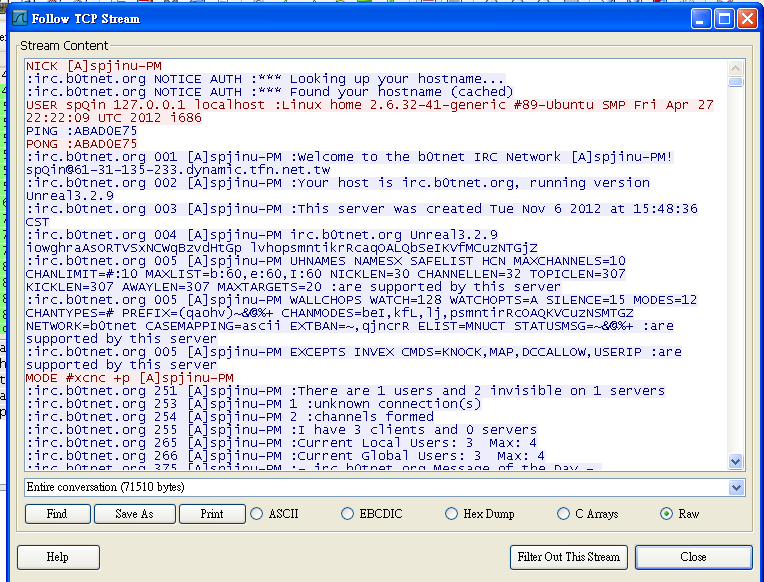
Although file command analysis this file as data, we can conclude this file is a pcap file by hex editor. So we can open this file by Wire Shark. After checking some packets, I find out some packet has use "PRIVMSG" command, which is IRC command. Therefor I follow TCP stream of those packet, and it is potential botnet traffic we need to analysis.
And observe this traffic, we can find a get command to 118.168.56.240
We first try to connect 118.168.56.240 directly, but it's fails. So we turn to find the traffic to 118.168.56.240 by wireshark. After selecting those packet and following TCP stream, we find the key in packet.
  

2012年12月23日 星期日

Malware Detection System Based on SplitScreen

This is a simple project implemented by python. With the power of SplitScreen approach proposed in usenix security, this system can detect if a file is belong to black list. To handle explosion of malware signature, match the signature one by one is not enough and more efficient approach to identify known malware. SplitScreen employs Bloom Filter Algorithms for signature management, distribution and  detection.

Bloom Filter

Data Structure and Algorithms

Bloom Filter composed by  an n bits bit-vector which initialized all bits to 0 and k different hash functions. Bloom Filter support two operation, add and query. Add operation is used to add new element in to Bloom Filter. Add operation first compute k hash functions of the element and then set correspond bit 1.
In the same way, query operation compute k hash functions of the element and then check if correspond bit is set. If all the correspond bits is set to 1, then we can claim the membership of this element. If one of the correspond bits is clear, this element is not belong to the set.
  

Time and Space Complexity

The time to add and query both have time complexity O(k) , where k is the constant we can set. So we can estimate the two operations complete in constant time. And Bloom Filter is also space-saving because it take only n bits to store Bloom Filter.

Split Screen

Architecture

Split Screen has three components : Malware Database, Server and Client Agent.
Fig 1 System Architecture
Malware Signature Database is used to store all malware sample, in my case the samples is come from vxheaven.  And Server is aim to maintain BloomFilter structure and update new Bloom Filter to Client Agent.
        

System Flow

In my system , server will check malware database for newly update malware and add new malware to Bloom Filter. Then send a command to client for updating BloomFilter.

Implementation

In my implementation, source code structure is as below:
[server]
FFBFServer.py
[client]
FFBFCli.py
client.py
[common]
BF_Operation.py
FeedForwardBloomFilter.py
DirectoryList.pyHash.py

First we look into Hash.py, Although Bloom Filter need k different hash , in practice we can use linear combination of two hash functions instead. So Hash.py only compute two hash value about a file. 
With Hash.py's help, FeedForwardBloomFilter.py implement add and query operation.
class FFBloomFilter(object):
    def add(self,fname):
        self.hashClass.hash(fname)
        val1 = int(self.hashClass.getHash(),16)
        val2 = int(self.hashClass.getHash2(),16)
        hashValue =val1%self.size
        for _ in range(self.hashNum):
            self.bf1[hashValue]+=1
            hashValue+=val2%self.size
            hashValue%=self.size
            
    def query(self,fname):
        self.hashClass.hash(fname)
        val1 = int(self.hashClass.getHash(),16)
        val2 = int(self.hashClass.getHash2(),16)
        hashValue =val1%self.size
        for _ in range(self.hashNum):
            if self.bf1[hashValue]==0 :
                return False
            hashValue+=val2%self.size
            hashValue%=self.size
            
        hashValue =val1%self.size
        for _ in range(self.hashNum):
            self.bf2[hashValue]+=1
            hashValue+=val2%self.size
            hashValue%=self.size
        return True

BF_Operation.py implement algorithms in SplitScreen as Fig 2
Fig 2 SplitScreen Architecture
class BF_Operation(object):
    def __init__(self):
        self.hashNum = 10
        self.bitSize = 1024*1024
    
    def FFBF_INIT(self,path,outBF):
        ffbf =  FeedForwardBloomFilter.FFBloomFilter(self.bitSize,self.hashNum)
        Dir = DirectoryList.DirList()
        Dir.ListAdd(path,ffbf)
        ffbf.serialize(outBF)
    
    def FFBF_SCAN(self,path,inBF,outBF):
        ffbf =  FeedForwardBloomFilter.FFBloomFilter(self.bitSize,self.hashNum)
        ffbf.parsing(inBF)
        Dir = DirectoryList.DirList()
        ffbf.clear()
        matchdata = []
    
        Dir.ListCheck(path,ffbf,matchdata)
        ffbf.serialize(outBF)
        return matchdata
Where ListAdd() and ListCheck() treat a path of directory as input and add(check) all files in directory. In the paper, there are two more algorithms, FFBF_HIT() and FFBF_verify(), which are not needed while we only need to test membership of files.

2012年10月11日 星期四

Ether System Call Trace and Instruction Trace

Ether Introduction
Ether is proposed in CCS'08, which is the first malware analysis system based on Harware Virtualization Extension.

In traditional analysis , software emulation is widely employed. With the help of binary translation, instrumentation can be achieve easily. However some malware employ technique like anti-debugging, anti-instrumentation, and anti-VM to avoid analysis. Due to software emulation nature, all the instruction must be translate and expose more emulation bugs. Moreover , software emulation locate translator in the same system level with target system which approach is more easier to detect.

Ether has following functions

  1. Instruction Trace
  2. System Call Trace
  3. Memory Write Detection
  4. Unpack Detection
This article will analysis source code of instruction trace and system call trace. Memory write detection and unpack detection will leave in future discussion. 

Instruction Trace

There are two steps to implement instruction trace, setting trap flag and debug trap handler. Setting trap flag is used to enable debug trap in every instruction. Then after each trap , debug trap handler will be triggered and send instruction to user space.Approach here is similar to Hyperdbg, which was presented in ASE'10.

Setting Trap Flag

Ether set trap flag by function vmx_properly_set_trap_flag in "xen/arch/x86/hvm/vmx/vmcs.c".

  1. GUEST_INTERRUPTIBILITY_INFO
    Clear Bit 3 in GUEST_INTERRUPTIBILITY_INFO register to forbiden pending NMI interrupt.
    unsigned long int_state =
      __vmread(GUEST_INTERRUPTIBILITY_INFO);
      if((int_state & 3) )
      {
       int_state &= ~(3);
       __vmwrite(GUEST_INTERRUPTIBILITY_INFO, int_state);
      }
    
  2. EXCEPTION_BITMAP
    unsigned long intercepts = __vmread(EXCEPTION_BITMAP);
      unsigned long mask = (1UL << TRAP_debug);
      /* make sure the exception bitmap says to vmexit on 
       * debug exceptions
       */
      intercepts |= mask;
      __vmwrite(EXCEPTION_BITMAP, intercepts);
    
  3. GUEST_RFLAGS
    unsigned long flags = __vmread(GUEST_RFLAGS);
      unsigned long flags_mask = (X86_EFLAGS_TF);
      __vmwrite(GUEST_RFLAGS, flags);
      vmx_set_pending_exceptions(v);
    
This operation will be taken before VM-ENTER and after each VM-EXIT handler. In vmx_do_resume(), VMM execute  reset_stack_and_jump() and go back to Guest OS. Therefor it is suitable to place vmx_properly_set_trap_flag() before reset_stack_and_jump().

Debug Trap Handler  

Once trap flag is properly set, every instruction will cause a VM-exit trap. Then control will transfer to  VMM. To record every trap, we must modify vmx_vmexit_handler function in "xen/arch/x86/hvm/vmx/vmx.c". In case EXIT_REASON_EXCEPTION_NMI of exit_reason switch, if exception vector is TRAP_debug then we can record this instruction.

System Call Trace

Enforce sysenter to trap

When Ether initialize, Ether will execute ether_initialize() (in xen/arch/x86/hvm/ether.c) and set forced_sysenter_cs, forced_sysenter_eip to 0.
d->arch.hvm_domain.ether_controls.forced_sysenter_cs = 0;
d->arch.hvm_domain.ether_controls.forced_sysenter_eip = 0;
Once we need to record system call, XEN_DOMCTL_ETHER_SET_SYSENTER event will be trigger in arch_do_domctl function(xen/common/domctl.c).
case XEN_DOMCTL_ETHER_SET_SYSENTER:
    if(op->u.ether.sysenter_eip)
    {
 /* operation = set msrs and force their values
  */
        /*Set forced_sysenter_cs to op->u.ether.sysenter_cs*/
 ether_set_sysenter_cs(d, 
  op->u.ether.sysenter_cs);
        /*Set forced_sysenter_eip to op->u.ether.sysenter_eip */
 ether_set_sysenter_eip(d, 
  op->u.ether.sysenter_eip);
        /*Set should_force_sysenter_msr to 1*/
 ether_force_sysenter_msrs(d, 1);       
    }
After those operations, vmx_set_sysenter_msrs() will be called by vmx_properly_set_trap_flag().
inline static void vmx_set_sysenter_msrs(struct domain *d)
{
 u64 new_cs;
 u64 new_eip;
 /* write MSR registers */

 /* default to writing old(imaginary) values to guest */
 new_cs = ether_get_imaginary_sysenter_cs(d);
 new_eip = ether_get_imaginary_sysenter_eip(d);

 if(ether_should_force_sysenter_msr(d))
 {
  /* it seems that we should write user supplied
   * values instead
   */
  u64 forced_cs;
  u64 forced_eip;
  /* writing user supplied forced values to guest */
                /* Get forced_sysenter_cs and forced_sysenter_eip*/
  forced_cs = ether_get_sysenter_cs(d);
  forced_eip = ether_get_sysenter_eip(d);

  if(forced_cs)
   new_cs = forced_cs;

  if(forced_eip)
   new_eip = forced_eip;

 }
        /*Update guest OS MSR*/
 vmx_write_sysenter_msr(GUEST_SYSENTER_CS, new_cs);
 vmx_write_sysenter_msr(GUEST_SYSENTER_EIP, new_eip);
}

Upon vmx_set_sysenter_msrs executes, guest OS will be forced to trap when system call occurs.Then we can get the system call information in VM-Exit handler.

Handle trap due to sysenter

When VM-exit is triggered, vmx_handle_debug_exception() will execute inside vmx_vmexit_handler().(in xen/arch/x86/hvm/vmx/vmx.c)
asmlinkage void vmx_handle_debug_exception(struct vcpu *v, 
  struct cpu_user_regs *regs)
{
 /*
  * things to do
  * 1) grab instruction we trapped at
  *  a) get instruction length (possibly via decode?)
  *  b) grab instruction from memory
  * 2) reset flag for setting trap flag on next instruction
  * 3) call userspace handler for instruction step
  */

 if(ether_get_stepping_type(v->domain) != ETHER_BP_AUTO_STEP)
 {
  ether_handle_instruction(v, regs);
 }
 else
 {
  /* check saved gva == current RIP */
  unsigned long rip = __vmread(GUEST_RIP);
  unsigned long cr3 = hvm_get_guest_ctrl_reg(v, 3);
  unsigned long thread_id = ether_get_windows_tid(__vmread(GUEST_FS_BASE));
  int match_type; 

  match_type = ether_bp_in_list(v, rip, cr3, thread_id);

  if(match_type == ETHER_BP_FULL_MATCH)
  {
   struct ether_bp_list *removed_item;
   /* disable_stepping takes care of changing
    * the stepping type as well
    */
   ether_disable_stepping(v->domain);
   removed_item = ether_bp_get_and_remove(v, rip, cr3, 
     thread_id);

   if(removed_item != NULL)
   {
    ether_handle_syscall_return(v, removed_item->call_number, regs);
    xfree(removed_item);
   }

   
  }
  else if(match_type == ETHER_BP_GFN_MATCH)
  {
   unsigned char two_byte[2];
   two_byte[0] = two_byte[1] = 0;

   hvm_copy_from_guest_virt(&two_byte, rip, 2);
   /* about to hit an INT instruction */
   if(two_byte[0] == 0xCD)
   {
    unsigned long bp_location = 0;

    bp_location = 
     ether_read_idt_entry(two_byte[1]);

    if(bp_location != 0)
    {
     /* ignore ESP and call# in breakpoint
      */
     if(0 < ether_bp_create(v, bp_location, cr3, 0, 0, 1))
     {
      /*printk("ETHER_BP: set bp for INT handler: 0x%lx\n",*/
        /*bp_location);*/
     }
    }
    else
    {
     printk("ETHER: could not read IDT entry\n");
    }
    
   }
   ether_disable_stepping(v->domain);
   ether_bp_mark_np(v, ether_bp_get_known_gva(v),
    1, 1);

  }
  else if(match_type == ETHER_BP_NO_MATCH)
  {
   ether_disable_stepping(v->domain);
   /* mark page NP again */
   ether_bp_mark_np(v, ether_bp_get_known_gva(v),
    1, 1);
  }
 }
 
}

Reference

XEN internal
http://www.docin.com/p-334444719.html
http://wiki.xen.org/wiki/Mini-OS-DevNotes

ETHER webpage
http://ether.gtisc.gatech.edu/source.html#patching_xen
http://www.offensivecomputing.net/?q=node/1575
https://groups.google.com/forum/?fromgroups=#!topic/ether-devel/Us47vyfwnZE
http://mether.googlecode.com/svn/trunk/ether/vmx.c

XEN VMEXIT HANDLER
http://www.cnblogs.com/superymk/archive/2010/02/02/1661686.html
http://old-list-archives.xen.org/archives/html/xen-devel/2010-07/msg01675.html
http://lkml.indiana.edu/hypermail/linux/kernel/1205.0/02778.html

XEN Single Step Trap
http://comments.gmane.org/gmane.comp.emulators.xen.devel/113088

XEN Debugger
http://www.xen.org/files/xensummit_intel09/xen-debugging.pdf

Research Paper
XenLR: Xen-based Logging for Deterministic Replay*
http://grid.hust.edu.cn/hkliu/index_files/XenLR%20Xen-based%20Logging%20for%20Deterministic%20Replay.pdf
Deterministic Replay for Xen
http://www.cs.ubc.ca/~sara88/538wslides.pdf

Improving VMM based IPS for real-time
snapshot and nullification of buffer overflow
exploitation
http://homepage2.nifty.com/way_to_hack/pdfs/jwis06RuoAndo.pdf

2012年9月27日 星期四

Xen Paravirtualization

This article is based on “Xen and the Art of Virtualization,” from SOSP'03. It's the first paper for paravirtualization.

Virtual Machine Interface

CPU Privilege Level

There are four privilege level in x86 architecture, but most of OSes use only two privilege level. Therefore we can modify OSes to run in ring 1 and preserve ring 0 for Xen hypervisor.  So that privilege instruction will trap to hypervisor for updating and validating.

Exception

Guest OSes can register exception handler table to Xen Hypervisor . If the handler's code segment is not run in ring 0,  Xen create a copy of exception stack frame on guest OS then transfer control to appropriate handler.
Due to observe that system call is one of most frequently happened exception, improving system call's performance can largely effect overall system.To improve system call performance, Xen can check if any code segment of handler is in ring 0 when guest register exception handler. If there are no code segment in ring 0, guest OSes can directly execute the system call handler.

Memory Management

There are two TLB mechanism apply to Xen, that is software-managed TLB and tagged TLB. With  software-managed TLB , Xen can manage TLB directly. Tagged TLB associate each TLB entry with an address-specific identifier so that hypervisor and each guest can maintain their TLB in the same time.
There two principal in Xen's memory management. First , guest is response for allocating hardware page table. Second, Xen located in first 64 MB of every address space.

Device I/O

Different to other full virtualization system, which emulate each device I/O, Xen use an device abstract for device. Every device I/O will be transfer from it's domain to hypervisor by a shared-memory, asynchronous buffer- descriptor rings. In additional, Xen use event-delivery mechanism send back notification to each domain.

Mechanism Design

Control Transfer

Hypercall

To perform privilege instruction, domain U will trigger a software trap and send a hypercal to make Xen perform corresponding action.   

2012年9月19日 星期三

XEN Basic

Xen Virtualization Introduction

Virtualization is one of most important technique in nowaday computer system.With virtualization mechanism , services such as cloud computing, application mobility and co-location facility can be implement.

Xen is the virtual machine monitor that first proposed in SOSP'03 by University of Cambridge. Xen is aim to provide high performance resource management. In the other hand , Xen hypervisor must isolate each virtual machine from others.Finally Xen must support wide range of  heterogeneity operating system.

http://www.cl.cam.ac.uk/research/srg/netos/papers/2003-xensosp.pdf

Virtualization type

In 2003 , Xen was first proposed with paravirtualization architecture. Just after Intel proposed VT-x in 2005 , Xen release version 3.04 which support hvm client.  Figure 1 show both two type's architecture. 
Figure 1 : Xen Architecture

Paravirtualization 

Compare to full virtualization used by VMware's ESX server which not need to modify guest OSes, Xen employ paravirtualization that need to make some minor change to guest OSes. After modification, Xen can offer the same abstraction between virtual machine and underlying hardware ,so that performance can be improved.   

Hardware-assisted Virtualization

After VT-x published, consistent view between sensitive instruction and privilege instruction let full virtualization easily.That is , all the sensitive instruction execute in guest will cause a trap to VMM. With the power of VT-x, Xen are modify to support HVM which has no need to modify guest OSes.  Latter in 2006, "Extending Xen with Intel Virtualization Technology" was published in Intel Technology Journal .This article states changes for Xen to support HVM.

Xen Basic installation

Reference

  1. “Extending Xen* with Intel® Virtualization Technology,” Intel Technology Journal vol. 10, no. 03. 2006.
  2. P. Barham, B. Dragovic, K. Fraser, S. Hand, T. Harris, A. Ho, R. Neugebauer, I. Pratt, and A. Warfield, “Xen and the Art of Virtualization Categories and Subject Descriptors,” SOSP'03.
  3. Xen official website, http://www.xen.org/download/index_3.4.4.html
  4. WikiPedia ,  http://en.wikipedia.org/wiki/Xen